
Deer Park Roofing – Chimney Flashing
Chimney flashing is one of the most important details of a successful residential roof system. Roof leaks are commonly found near the base of the chimney and can usually be attributed to improper flashings. Brick chimney flashings consist of several components including underlayment, step flashing, a metal saddle, mortar, counter flashings, and solder. A skilled tradesman should follow these steps when installing new flashing to the chimney:

- The old flashing and roofing materials must be removed before new chimney flashing can be installed. The wood roof deck should be inspected and any damaged wood replaced prior to installing the underlayment. Ice and water guard underlayment should be installed around the chimney. Unlike roofing felt paper, ice and water guard seals directly to the roof deck and is an added layer of protection to prevent water from leaking into the house.
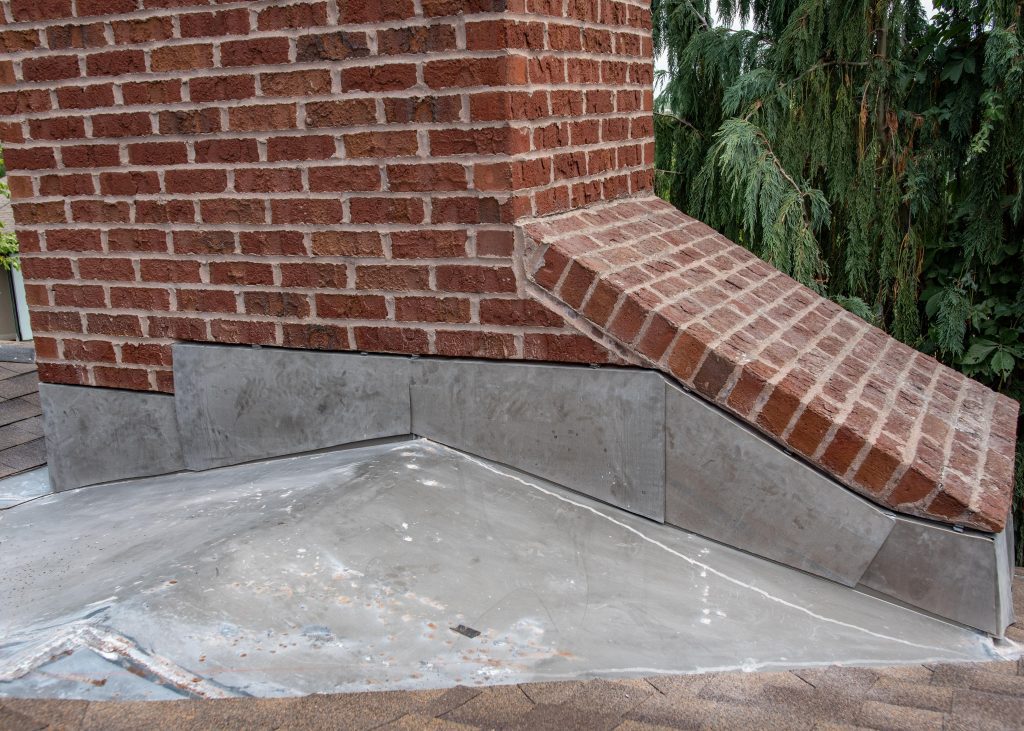
- Step flashing typically consists of 5″ x 7 5/8″ aluminum, copper, or steel that is custom fabricated with one 90 degree bend. One piece of step flashing is installed around the sides of the chimney at each corresponding course of shingles (or other roofing materials). Step flashings are commonly referred to as sub flashings because they are installed beneath counter flashings.
- Chimney saddles are another type of sub flashing and are installed at both the top and bottom of the chimney. A metal saddle consists of custom fabricated steel or copper that is soldered at the corners of the chimney.
- A grinder should be used to remove the existing mortar from the chimney. This will allow counter flashing to be installed ½ inch into the mortar. This step is very important and should not be substituted by a process that is less durable.

- Counter flashings are custom fabricated and installed over the step/sub flashings and into the mortar joints of the chimney. Counter flashings are held into place with lead plugs between the brick. Nails should never be installed into chimney counter flashings.
- Flashings are purified with a liquid flux prior to soldering. This eliminates oxidation on the surface of the metal and improves the soldering process.
- The chimney flashings are soldered to prevent water infiltration at the seams. Solder consists of a combination of lead and tin. A soldering iron is used to heat the solder to approximately 370 degrees (F) allowing all seams in the metal flashings to be fused together. Solder changes to liquid form at a lower temperature than steel or copper flashings.
- The shingles or other roofing materials are installed over the underlayment and around the chimney flashing.
- The chimney should be tuck pointed with mortar mix at all areas where the mortar was removed. Caulk should never be used in mortar joints when installing flashing to a chimney

- 26 gauge galvanized steel is an excellent choice of metal to use for chimney flashing because it is heavy duty, will resist corrosion, meets building code, and is easy to solder. Shortly after installation, steel chimney flashings must be cleaned with a degreaser so they will be able to accept 2 coats of direct to metal paint. The paint on the chimney flashing should be inspected every five years.
- Copper chimney flashings should not be painted and are maintenance free. Copper will react with dissimilar metals in the roof system such as aluminum and steel. When copper chimney flashings are installed, the gutters, valley metal, and other flashings should also be fabricated out of copper.
- A cricket is required on chimneys wider than 30 inches to divert water away from the center of the chimney.

This chimney flashing process includes time-tested industry practices to ensure the roof and chimney remain water tight far into the future. Items that should never be incorporated into the chimney flashing process are roof cement, caulk, and face nails to hold the flashings in place. It is important to verify the details in the installation process with your contractor prior to accepting their bid.
For a new roof estimate or chimney repair estimate Click Here.

 West Chester.")


 resize")
