Masonry

Residential Masonry

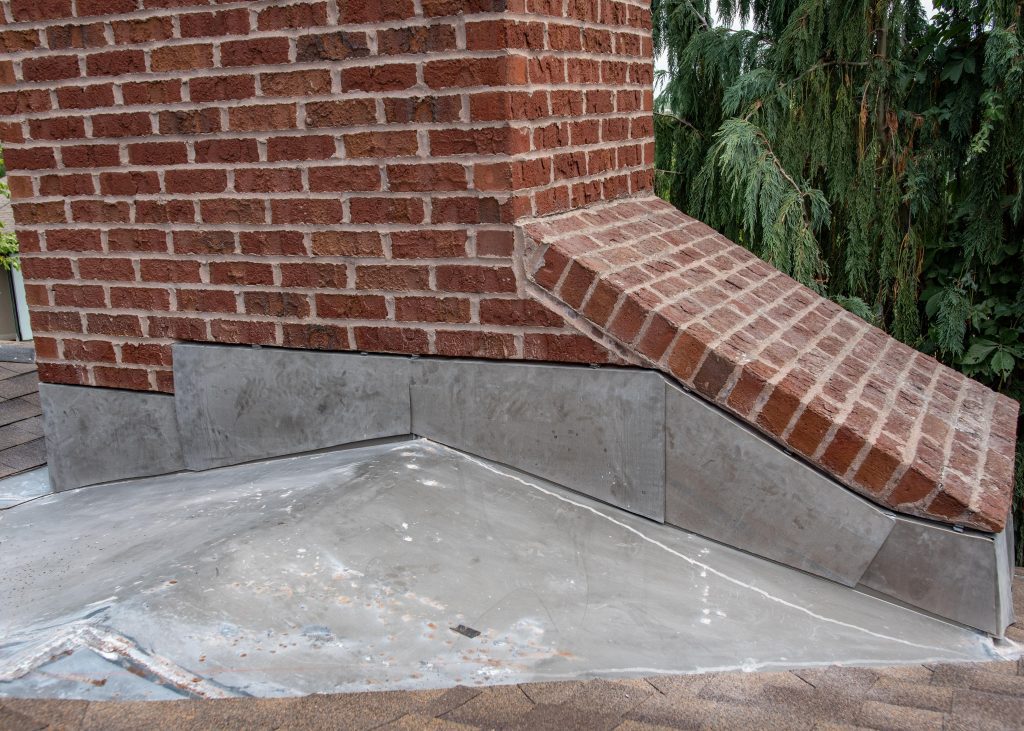
Maintenance and repair of brick and mortar above the roof line are essential for a roof system to function properly. Many roof Leaks occur near the chimney and can usually be attributed to defective flashings, cracks or deterioration in the chimney cap, or problems in the mortar joints of the chimney. For more information on chimney flashings, click here.

Masonry Repairs at Chimneys

It’s important to understand the various components of a masonry chimney, especially when determining the source of a roof leak. The bricks at the chimney should extend a minimum of 3 feet above the roof line at the base of the chimney. Each course of brick is bound with mortar to ensure the chimney is watertight and to uniformly distribute the weight load of the chimney. Flue liners are typically installed in chimneys to prevent heat transfer to combustible materials and prevent gases from penetrating the living space. A mortar cap or chimney crown protects the other components of a masonry chimney from the weather. Lastly, chimney flashings are embedded into the mortar and ensure that the roof is watertight at the transition between the roofing materials and the masonry system.

Common masonry repairs at chimneys are as follows:

    • Brick Replacement – Bricks can become damaged and need to be replaced. This usually occurs from water infiltration from the top of the chimney and worsens when the moisture is exposed to a freeze-thaw cycle. This cycle will cause bricks to deface and become brittle in nature. The best practice for brick replacement includes removing the brick and cleaning the area with a wire brush to allow new mortar to bond properly. A new brick and new mortar joints should then be installed. If a semi-permeable masonry sealant is needed, the mortar should set for fourteen days before application. Maintaining brick is vital to ensuring the longevity of the chimney. If neglected, extensive damage to the bricks can cause the need for the chimney to be rebuilt.
    • Tuck Pointing – Water can easily enter a house or building through deteriorated mortar joints, especially during heavy wind-driven rains. In order to effectively tuck point a chimney, all bad mortar should be removed with an electric grinder. Using a tuck pointing tool and mortar mix, the new mortar should be applied to clean brick in order for the joint to properly bond. Again, it is important to allow new mortar to set for fourteen days before applying water repellant.
    • Chimney Reconstruction – If damage to a brick chimney is found and the extent of the damage is deemed unrepairable, rebuilding the chimney is a viable repair option. This process starts by removing all bricks, mortar joints and flashings from the top of the chimney down to the areas that have not been affected by the damage. The most common areas that are unaffected by damage are beneath the roofline as they are less subjected to the elements of weather. After the majority of the exterior structure of the chimney has been removed, the clay flue liner(s) need to be inspected for damage. At this time, if necessary, the flue liner(s) would be replaced and would be set onto one another embedded in a fire and heat resistant mortar. Installing new brick will then commence. The chimney will need to be reconstructed using a style of brick that most resembles the brick being removed. These bricks will be set into a Type-S mortar mix and will need to be installed evenly both horizontally and vertically. This reconstruction will continue to the original chimney height or the appropriate height in accordance with building codes and fire safety regulations. red in inches. Common thicknesses of aluminum (from thinnest to thickest) include .019, .024, .027, and .032.
    • Cast in Place Chimney Crown – Cracks in chimney crowns cause damage to bricks and the interior of the house or building. Repairs to chimney crowns are rarely effective and should be considered temporary in nature. The old crown should be removed and replaced when cracks appear. At this time, the flue liner should be inspected for cracks or damage as well. To have a lasting crown, a barrier needs to be installed around each flue(s) and on the brick/filler that forms the top of the chimney. This will keep the concrete crown from bonding to the bricks or the flue(s). If allowed to bond to these components, cracking is likely to occur due to the expansion and contraction of the chimney, flue(s), and crown. When properly installed, the concrete crown should be able to float and expansion and contraction will not damage it. The crown should be installed with a two inch over hang and a drip edge underneath to prevent water from rolling down the brick. The concrete should be highest at the middle, then tapered to the edge of the form to prevent water from pooling on the crown. After the concrete has set, a masonry caulk is applied at the flue to make the moisture barrier water tight. Metal flue caps can be added to prevent water from entering the flue(s).
    • Chase Covers – Chase covers serve the same purpose as a masonry crown but are fabricated from metal. Chase covers are not commonly found over brick chimneys and are more common on wood framed chimneys. All chase covers need to be tapered to allow proper water runoff. A drip edge must be fabricated to allow water to drip away from the chimney. A collar, or flange at the flue penetration should be a minimum of 1-2” in height. Copper and stainless steel are naturally weathering metals and require very little maintenance. Galvanized steel chase covers can be used as long as they are properly painted and maintained. Fasteners should not be installed on the top of the chase cover, and instead the fasteners should penetrate on the sides to prevent water infiltration.
    • Chimney Flashings – Failures caused at chimney flashings are common as many contractors do not replace them at the time of a new roof installation. Flashings should always be replaced when a new roof is installed as it is much more expensive to do it at a later time as a repair. For more information about chimney flashings, click here.
Deer Park Roofing Chimney Flashing
Soldered Chimney Flashing With Metal 26 gauge Chimney Cricket(Prior to Painting) West Chester.
Chimney Flashing Soldering

Please do not hesitate to contact us for more information on pre-manufactured steel roofs or metal roof repairs.

News & Resources

Installed Counter Flashing before solder


Roof Flashing: different types, how to install them, and when you should replace them

If we look at a pie chart of our monthly service requests in Louisville Ky, leaks at roof flashings are the biggest piece of the pie.  A poorly installed flashing repair compromises the integrity of the roof.  At Deer Park…


Seamless gutters


10 Components of a Successful Gutter System

Gutters and Downspouts are designed to drain rainwater away from your home or building without causing damage to your foundation, basement, landscaping, or other building materials.  An effective gutter and downspout system includes a number of different accessories, including splash…


metal thermal movement


Understanding Thermal Movement

Understanding thermal movement in residential metal roof systems is key to long-term performance Roofing contractors often are amazed at the time-tested craftsmanship of sheet-metal systems that are removed from historical structures. It’s not uncommon for some of these systems to…


ice dam gutters


Ice Dams

Several factors contributed to problem roofing area in the photo below. Even though the shingles were in good condition and installed properly, leaks were occurring in the winter months due to ice dams. To remedy the situation, the homeowner installed…


Hail Damage to Roof Systems

Hail Damage to Roof Systems Hail storms can cause significant damage to all types of roofing systems, including asphalt shingles. Hail damage to roofs can be identified by discovering distress marks on the surface of the roof. In the case…


Chimney Flashing Soldering


Solder Versus Caulk

Solder A metal alloy that is used for permanently bonding metal flashings together. The word solder is derived from the Latin term solidare which means “to make solid”. Most solder, especially used in a roofing application, is made up of…


Residential Roof Repair or Replacement

Roof Leaks Roof failures occur for a number of different reasons. The main reasons are poor design, installation errors, age of roof, and flashing defects. The most common types of failures are noticed in roof leaks. These are normally discovered…


Louisville Drip edge


5 Types of Drip Edges on Metal Flashings

5 Types of Drip Edges on Metal Flashings Drip edge can be found on many metal flashings and components that are installed on your roof system, including: Gutter apron Rake edge flashing Gravel stop Chimney caps Coping The outward projecting lower…


dissimilar-metals


Dissimilar Metals in Roofing Applications

Be Cautious When Using Dissimilar Metals in the Same Roof System Many different types of metals are used in various roofing materials, flashings, and fasteners. Problems can occur when two different types of metals (also known as dissimilar metals) are…


Algae on roofs


Algae Roof Stains

Roof discoloration from algae or fungus growth made its way to the Cincinnati area about 10 years ago. It originated in the coastal areas of the southeastern United States and traveled north. The name of the algae is Gloeocapsa Magma.…


Soffit and Eave Intake Vents

Traditional homes, like the one pictured above, contain an overhang near the eave area where intake vents can be installed. The intake vents are the most important component to any roof ventilation system. As warm air in the attic rises,…


Insulating and Ventilating a Cape Cod House

Cape Cod Stye homes are very common in the Louisville KY area. These are typically smaller 1 story homes. Insulating and ventilating cape cod style houses can be very challenging. Anyone who has lived in one of these types of…


Metal Patio Roof – Cincinnati and Northern Kentucky

Deer Park Roofing replaced the asphalt shingles on this patio roof with a beautiful new standing seam metal roof. This customer wanted to remove the asphalt shingles from their patio roof and install a standing seam metal roof. Since the…


Deck Waterproofing Project – Cincinnati and Northern Kentucky

Deer Park Roofing designed and installed this beautiful new deck to create a covered, waterproof patio underneath. This is a photo of the deck that was removed. A new deck is being installed with the goal of achieving a waterproof…


Mold in Attic

A close examination of the photo above reveals large amounts of mold on the underside of the roof sheathing. What caused the mold and why did it thrive in this attic space? 1. The insulation was improperly installed over the…


Shingle Installation Methods: Hand Nailing vs. Nail Gun

Which Shingle Installation Method is Better – Hand Nailing or Nail Gun? The question is often asked as to which nailing method will yield the best results when installing a new roof. Is it better to fasten the shingles by…